Follow our 3-step guide to a new Mitsubishi 915B455011 / 915B455A11 lamp in the Mitsubishi WD-73742 RPTV.
Step 1: Know when to replace
The first indication that the Mitsubishi 915B455011 / 915B455A11 lamp needs to be replaced is a picture that is becoming dimmer.
When you see the RED light on the front control panel on your Mitsubishi WD-73742 RPTV, it’s also time to replace the lamp immediately.
When the TV is operating normally, this indicator will not be lit. When has turned RED, the lamp has burnt out and since this is the only source of light for the TV, it will not turn on. Replace the Mitsubishi 915B455011 / 915B455A11 lamp immediately.
Step 2: Buy authentic
It’s important that you install an OEM lamp and avoid a generic, compatible RPTV lamps.
Knock-off, compatible generic lamps may seem like a bargain in the beginning. They actually cost more in the long run since they can damage the color wheel and ballast mechanisms in your RPTV. They also give off poor light, are prone to messy explosions and actually have a shorter life.
There are also health concerns associated with these lamps. Generic lamps are made with toxic substances that can compromise your family’s health. Read more about the dangers of Krypton-85.
When you purchase an OEM replacement lamps you’re guaranteed the best lamp for your RPTV.
We recommend purchasing from an Authorized Philips dealer such as Discount-Merchant.com to insure that you are receiving a genuine Philips brand replacement lamp. Beware of knock-off and counterfeit Philips lamps floating around in the market.
 Advantages of OEM lamps
• Brilliant brightness and luminosity: Your OEM lamps has been built to work in harmony with every component in your RPTV. Keep the optics, power supply, electronics and processing algorithms in sync to provide the best image possible – the reason who invested in an RPTV.
• Color: Genuine lamps have the correct technology to give the correct optical alignment of your color wheel and give consistent color across the whole screen.
• Safety: Your RPTV operates at extremely high temperatures. The quartz, glass and wires in your lamp have to be able to withstand the high pressure heat. Scruplous OEM manufacturers lamps have tested their lamps for safety. Generic manufacturers have not.
• Lamp Life: Only OEM lamps have the durability to work for their entire lifespan. Only genuine lamps give you the guaranty of full life performance along with a money back guarantee. Installing a generic knock-off lamp will void your warranty and should any damage be done to your RPTV you’re on your on for repairs. Why threaten the investment you’ve made in your RPTV to sake a few dollars?
Learn the 7 Ways to spot a counterfeit lamp.
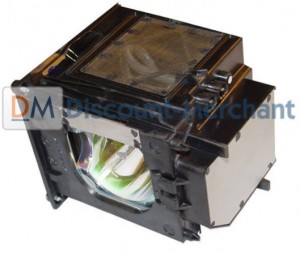
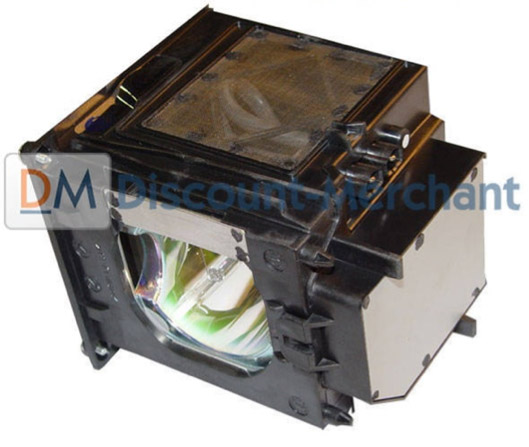
Installing the new Mitsubishi 915B455011 / 915B455A11
Before installation: Turn off the TV and allow it to cool for one hour. Failure to do so can put you at risk of burning yourself since the Mitsubishi WD-73742 operates under high heat.
TIP: Use a pair of rubber gloves during installation. These lamps contain mercury, which may end up on your skin. Don’t touch the lamp glass with bare hands as the oil form your fingers may cause premature lamp failure.
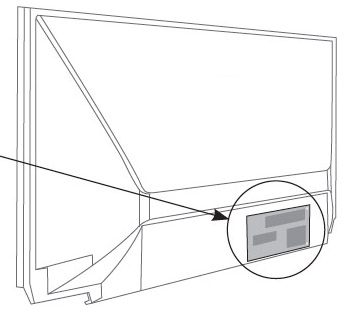
- After TV has cooled, turn the TV around to access the lamp cover located at the back of the Mitsubishi WD-73742 RPTV.
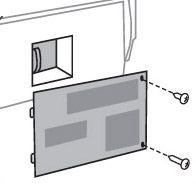
- Using a #2 Philips screwdriver, loosen the screw holding the cover in place. Put the cover to one side.
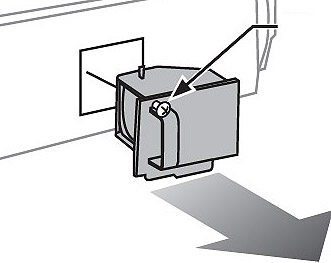
- Loosen the screw securing the lamp cartridge, releasing it from the mating threads. This is a captive screw so it will not be separated the lamp cartridge.)
- When the screw is loosened, gently grasp the handle on the lamp cartridge and pull the lamp straight out. DO NOT TILT, as there may be glass fragments that will fall inside the TV.
- If this happens, carefully pick up the larger shards wearing rubber gloves. Take a cloth just damp enough to pick up the small shreds. It’s important to pick up the broken lamps since this lamps does have mercury. Read more about proper clean-up from the EPA.
- Learn what to do should the bulb shatter.
- Take out the bag supplied with your new lamp and open it up. You’ll store the old lamp in this bag.
- Put the old lamp gently into the opened bag. Close the bag.
- Gently slide in the new Mitsubishi 915B455011 / 915B455A11 Lamp into the slot, making sure not to tile the lamp.
- Tighten the screw in the lamp.
- Replace the cover and tighten the screws.
NOTE: The Mitsubishi 915B455011 / 915B455A11 Lamp contains mercury and should not be thrown into regular garbage. Recycle your used lamps! If you bought from an authentic manufacturer, they will recycle the lamp for you at no extra cost (another reason to buy authentic lamps).
Learn how to extend the Mitsubishi 915B455011 / 915B455A11 Lamp. Read 7 Tips for extending RPTV lamp life.