RCA Lamp Replacement Guide
Please note that this article may be outdated. Visit guides.fixyourdlp.com for more comprehensive installation and repair guides!
Do you have a RCA TV and need a replacement lamp, part number: 265866, 265919, 269343, or 270414? Click here for the best price online! Did that RCA DLP lamp go out on you? It’s a simple fix. Don’t throw that TV away or go with an expensive TV repairman. Often times it’s cheaper to first change the lamp than to call a service technician for $150+. Always buy an OEM part.
We also recommend replacing the entire enclosure if it looks damaged or warped as this may cause your lamp to be misaligned inside the television!
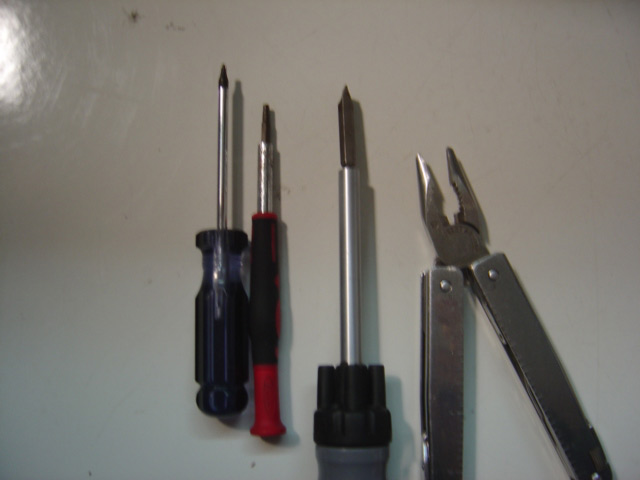
To replace just your lamp, all you need is:
- An RCA DLP lamp made by Philips
- A flat-head screwdriver
- A T-10 & T-15 Torx driver
- A pair of plyiers
- A pair of gloves or a lint-free cloth (to wipe the glass down afterwards)
Step 1: Locate the lamp.
Here is the back of a typical RCA DLP TV… your TV may look slightly different.
The lamp is behind this rectangle door!
You’re going to need your flat-head screwdriver to loosen this screw:
Loosen the screw and then use the two “clips” to open the compartment door.
What we’re looking at it is the lamp enclosure. There is one screw on each side that need to be loosened.
Now you can gently pull back the tray and viola, you have removed your lamp!
This is what it should look like pulled straight back…
Step2: Remove the lamp from the enclosure
This is a picture of the enclosure with your old lamp facing downward. Visually inspect the area labeled
“Clip.” They are on the top and bottom of the enclosure. Between them, there is about a 3″ gap where
you need to push in with your thumb to be able to pull out the rear lamp cover.
The following picture looks at the other side of the lamp enclosure. As you are pushing in on the lamp enclosure,
you want to release these:
Here is a fuzzy picture with that part of the enclosure disassembled and now it is held together by the wiring
Now we have access to unscrew the lamp connectors with your plyer and torx driver. Once the back of the
enclosure is removed…
Now you have access to remove the three screws circled above…Here is a recap of your parts so far…
I’ve swapped out my old Lamp / Bulb with a new, original replacement lamp above…remember the washer!
When assembling the rear enclosure back on, remember to double check and make sure everything is in place.
The bottom has not been installed correctly in this picture.
Installation is in reverse order… here are some more photos
It took me about 5 minutes from enclosure removal to enclosure re-install… it might take an inexperienced user 10-15 mins…
IMPORTANT: The bulb should be handled with a clean cloth to avoid any dirt or oil. Our hands are naturally oily… this is a no-no for these lamps. It doesn’t hurt to do a final wipe with a clean, non-abrasive, lint free cloth before reinstalling your lamp. Alternatively, you can wear a pair of latex gloves!
If you need a replacement lamp, part number: 265866, 265919, 269343, or 270414? Click here for the best price online!