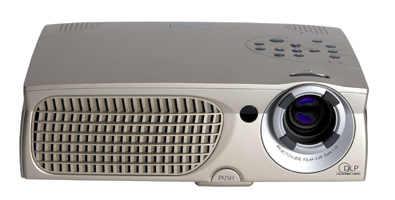
Replace the Optoma Theme Scene H56 projector lamp using this simple guide.
As the Optoma Theme Scene H56 projector lamp approaches its end of life at 2000 hours, a warning message will be projected: “Lamp may fail soon! Replacement Suggested!”
You may also notice the projected image is becoming less defined and that the colours are off. Have your authentic Optoma BL-FU200A (SP.83601.001C) lamp ready.
Go with authentic projector lamps
It can be confusing trying to find the correct Optoma BL-FU200A (SP.83601.001C) projector lamp since there are so many choices. It’s easy to get duped into buying an inferior knock-off lamp posing as an authentic one. Always look for the seal of approval and watch for telltale signs you are about to purchase a counterfeit lamp:
- low price that seems too good to be true.
- labelling that looks amateurish
- Mismatched elements, glue on the edges.
- Bulb that is scratched inside its cage
Remember that generic lamps have a much shorter life and are often created with toxic chemicals as substitutes. They are also prone to overheat and explode and are often not properly calibrated to work with the sensitive electronics in your Optoms Theme Scene H56 projector.
Buy this lamp on Amazon from the following authorized dealers:
Installing the Optoma BL-FU200A projector lamp
When your Optoma BL-FU200A lamp is reaching end of life you will see the Lamp LED on the Optoma Theme Scene H56 starts.
Follow these important safety tips before changing the projector lamp:
- Switch off the power to the projector by pressing the Power/Standby button.
- After waiting 30 seconds, disconnect the power cord.
- Allow the Optoma Theme Scene H56 projector to cool down for at least 30 minutes. If should be cool to the touch. These projectors run using high temperatures and you can burn yourself badly if you don’t allow the projector to cool down.
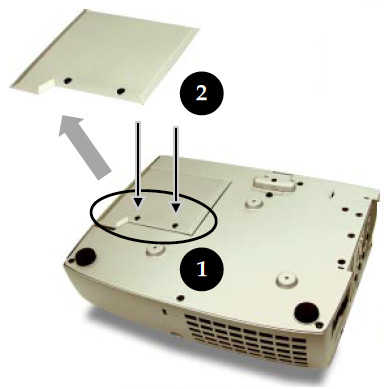
Step 1: Use a screwdriver to loosen the two screws holding the projector lamp cover in place. Make sure you have followed the safety tips before taking the cover off.
Step 2: Remove the projector lamp cover and place to one side. Don’t lose the screws to the cover as the Theme Scene H56 projector will not turn back on until the projector lamp cover has been properly installed.
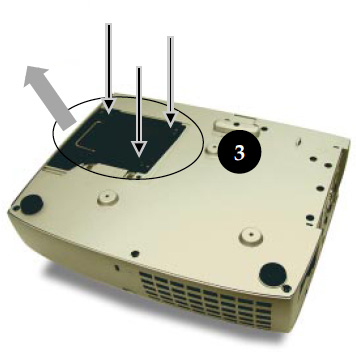 Step 3: Remove all three screws holding the Optoma BL-FU200A projector lamp in place.
Lift the wire handle and gently remove the projector lamp from the projector. Be careful not to hit the lamp or you can cause it to break. Learn what to do if the projector lamp is broken inside the projector.
- NOTE: The BL-FU200A projector lamp contains mercury and should not be thrown into regular garbage. Recycle this lamp.
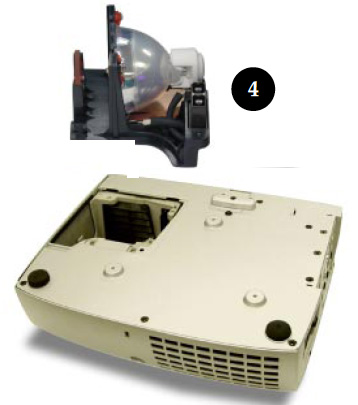
Step 4: Take the new Optoma BL-FU200A projector lamp out of its packaging and lift the handle on the projector lamp.
Gently place it into the projector making sure not to touch the actual bulb. Oil from fingerprint marks can burn black spots onto the projector lamp when it heats up.
Tighten the screws on the projector lamp. Close the lid. Tighten the projector lamp cover screws.
You are now ready to reset the lamp timer.
Reset the Optoma Theme Scene H56 projector lamp timer
Your Optoma Theme Scene H56 comes equipped with an automatic projector lamp timer that tracks the number of hours left for the Optoma BL-FU200A (SP.83601.001C) projector lamp. Each time you change the lamp you need to reset the lamp timer. Failure to do so may cause the projector to use the lamp over the recommended period of time resulting in the projector lamp exploding.
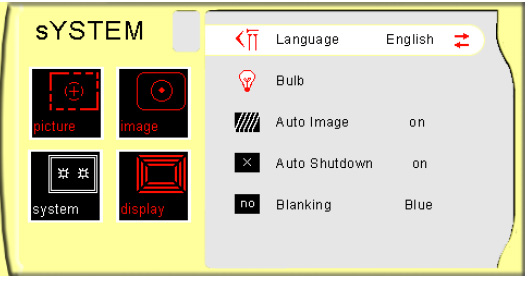
- Press the Menu button to open the On-Screen-Data (OSD) menu.
- Scroll over to the SYSTEM menu.
- Scroll over to the BULB option.
- Press Enter.
- The Status menu appears again showing the Lamp Hours reset to zero.