Don’t panic! Keep reading this step-by-step instructions on how to change the Optoma DX605 projector lamp.
First thing: Buy the right lamp!
Your Optoma DX605 projector is a sophisticated machine with sensitive optics. The best thing you can do to keep it working at its optimum levels is to use an authentic Optoma DX605 projector lamp replacement. Look for the seal of approval to purchase an OEM lamp.
(There are more tips at the end of the instructions on how to find the best lamp Optoma BL-FU180A ;
Buy this lamp on Amazon sold by these authorized dealers:
- Optoma BL-FU180A Projector Assembly with High Quality Original Bulb Inside
- Optoma BL-FU180A, UHP, 180W Projector Lamp (Discontinued by Manufacturer)
- Optoma Replacement Lamp (BL-FU180A) –
Know when the lamp needs replacing
When the Optoma DX605 projector lamp is approaching end of life, a replacement warning will appear on screen:

You may also start to see the following signs:
- A screen that is gradually dimming or deteriorating.
- Colour in the image appears dark or off colour.
- Lamp light flashing a steady orange.
Replace the Optoma BL-FU180A
Follow these important safety steps before installing a new Optoma BL-FU180A :
- These lamps contains mercury and should be properly recycled. Don’t throw it into regular garbage.
- Switch off the power to the Optoma DX605 projector by pressing the Power/Standby button.
- Disconnect the power cord.
- Allow the projector to cool down for at least 30 minutes. so it is cool to the touch. Trying to change the lamp while the projectors is not cooled down can result in serious burns as these projectors operate using high heat.
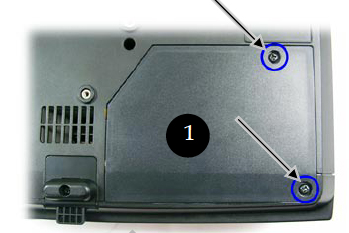
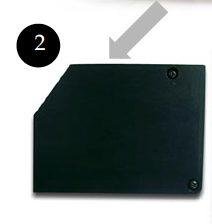
Place something soft underneath the Optoma DX605 before turning the projector onto it’s back. Remove the two screws holding the cover in place. Push the cover up to remove it.
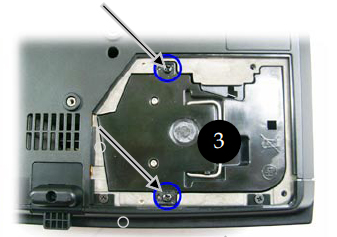
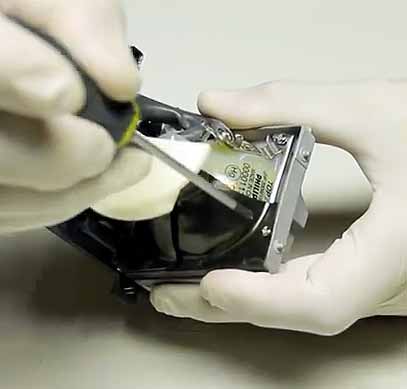
Remove the two screws holding the Optoma BL-FU180A lamp module in place.
Lift up the wire handle and slowly put out the old lamp. Be careful not to bang the lamp against the projector as this may case the bulb to break.
Learn how to properly clean up a broken lamp.
NOTE: The Optoma BL-FU180A contains mercury and should not be thrown into regular garbage. Recycle this lamp.
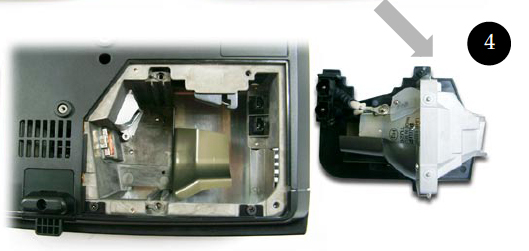 Remove the Optoma BL-FU180A from its packaging and using the wire handle, place it into the DX605 projector. Tighten the two screws on the lamp. Replace the lamp cover and tighten its two screws.
You must now reset the Lamp Replacement Timer.
Reset the lamp timing on the Optoma DX605
In order to track the lamp life, the Optoma DX605 projector has an automatic lamp timer that triggers the lamp replacement warning. You need to reset the timer each time the lamp is replaced.
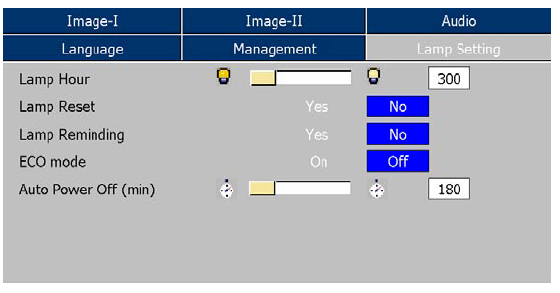
- Press the Menu option on either the remote or on the projector.
- Scroll over the Lamp Setting. Press Enter.
- Select Reset Lamp Hours. Press Yes
- The lamp hours is reset to zero.
- You can also used this screen to set ECO mode and turn off the lamp reminder message (not recommended to do).
WHY AVOID COPY-CAT PROJECTOR LAMPS?
Here are six good reasons to buy an authentic Optoma DX605 projector lamp:
- inferior workmanship which translates to an inferior product,
- they don’t last as long.
- improperly calibrated so can seriously damage the optics in your Optoma DX605
- present a health hazard due to their toxic materials.
- installing a generic lamp will void the warranty on the Optoma DX605
- offer no guarantee, technical or customer service even after the lamp has been purchased.
Tips for a Optoma BL-FU180A longer life:
- Turning on the Eco Mode to lower power consumption and extend the lamp life by 130%.
- Keep your air filters clean to avoid overheating the projector.
- Turn off the Optoma DX605 projector and let it stand for at least one hour ever 24 hours.
- Make sure there is enough airflow around the projector particularly if it’s been permanently mounted.
- Top tips for extending DLP projector lamp life.
Green alternative
Interested in reducing waste and recycling? The Optoma DX605 projector has an option of replacing only the projector bulb and reusing the plastic lamp cage. Watch our training video for more information on how to replace the bulb.