 Follow this guide to replace the Epson EMP-83H projector lamp
Watch for the signs that Epson EMP-83H projector lamp needs replacing:

- Dark image
- Image that has deteriorated
- On warning message appears on screen
- Lamp light flashes orange
Why buy an authentic lamp?
The Internet has been flooded with companies offering “generic” compatible lamps. Although they seem like a bargain, these lamps are actually not good for your Epson EMP-83H projector:
- generic have a much shorter lamp life than OEM lamps
- copycat lamps are often created with toxic materials and carcinogenic parts including Krypton-85
- compatible lamps are prone to explosions
- generic lamps are not calibrated properly and can the sensitive electronics in projectors
- copycat manufacturers offer no guarantee or refunds
- the warranty on your Epson EMP-83H projector will become void.
Be sure the purchase an authentic Epson ELPLP42 to protect your health and the safety of your Epson EMP-83H projector. Read more about the 7 Ways to Spot a Counterfeit Lamp.
Buy this lamp on Amazon sold by these authorized dealers:
- Epson – ELPLP42 Replacement Projector Lamp for PowerLite 822+/822p/83+/83c V13H010L42 (DMi EA
- EPSON EMP-400WE Replacement Projector Lamp ELPLP42 / V13H010L42
- AuraBeam Economy Replacement Projector Lamp for Epson ELPLP42 With Housing
- ePharos ELPLP42 / V13H010L42 replacement projector lamp compatible bulb with generic housing for Epson EB-140W; EMP-280; EMP-400; EMP-400W; EMP-400WE; EMP-410W; EMP-822 EMP-822H; EMP-83; EMP-83C; EMP83H; EMP-83HE
- Genuine ALTM ELPLP42 Lamp & Housing for EPSON Projectors – 180 Day Warranty!!
Install the Epson ELPLP42
Before installation:
- Turn off power switch on the back of the Epson EMP-83H projector.
- After you turn off the projector’s power and the confirmation buzzer beeps twice, disconnect the power cable
- Allow the Epson EMP-83H projector to cool for one hour – it should be cool to the touch. Inside of the projector can be very hot since these machines operator under high temperatures and you run the risk of being burned if the projector has not cooled down.
- Do not operate the projectors while any of the lamps are removed as this may result in malfunctions, fire hazard and other accidents.

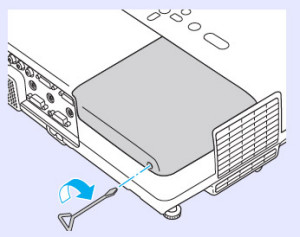
1. The lamp cover is found on top of the Epson EMP-83H projector. Loosen the lamp cover screw — you can’t remove it only loosen it.

2. Slide the Epson EMP-83H projector lamp cover off.
3. Loosen the two screws holding the Epson ELPLP42 lamp in place/
 4. Grab the Epson ELPLP42 lamp by the two indents on the lamp. Gently remove the lamp. Pulling too quickly can cause the bulb to shatter. Learn what to do should the bulb shatter.
NOTE: The Epson ELPLP42 lamp contains mercury and should not be thrown into regular garbage. Recycle your used lamps!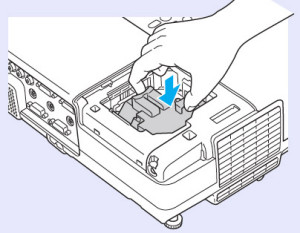
5. Gently insert the Epson ELPLP42 lamp making sure it’s facing the right way. NOTE: Don’t touch the screen or the actual bulb with your finger since the oil from your skin can cause a black spot on the bulb.
6. Tighten the screws on the new Epson ELPLP42 lamp.
7. Replace the lamp cover and tighten the screw on the Epson EMP-83H projector lamp cover.
8. Reset the lamp timer.
Reset the lamp timer
Reset the Epson EMP-83H projector Lamp Replacement Counter only when the Epson ELPLP42 lamp has been replaced.
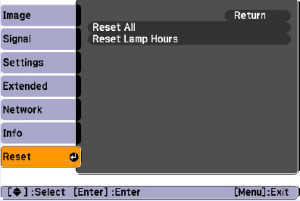
- Press the MENU button on the remote control. The Lamp Reset Menu will appear.
- Scroll down to the RESET. Press ENTER.
- Click on RESET ALL.
- A prompt appears asking if you want to replace the lamp.
- Select YES and press ENTER.Press MENU to exit.
Prolong the life of the Epson ELPLP42 lamp:
Extend the life of the newly installed Epson ELPLP42 with the following tips:
- Keep your air filters clean to avoid overheating the projector.
- Turn off the Epson EMP-83H projector projector and let it stand for at least one hour ever 24 hours. An average use of four to five hours per day will ensure longer lamp life.
- Make sure there is enough airflow around the projector particularly if it’s been permanently mounted.
- Learn more with Top tips for extending DLP projector lamp life