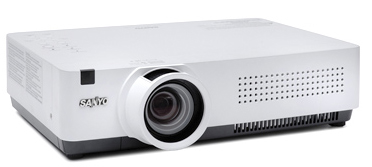
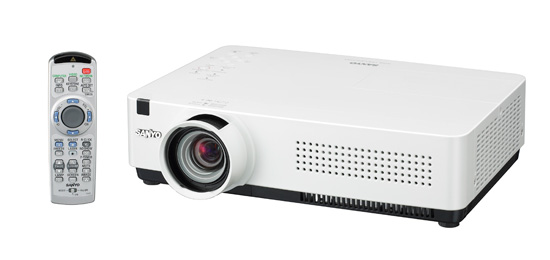
Sanyo PLC-XU355 Projector, Sanyo POA-LMP131 (service parts no 610 343 2069)
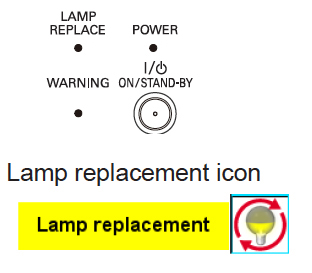
When your Sanyo POA-LMP131 (service parts no 610 343 2069)projector lamp is nearing its end of life you’ll see the Replace Lamp icon appear on the screen and the Lamp Replace Indicator will start flashing yellow. Depending on the Lamp Mode chosen, the Sanyo PLC-XU305/PLC-XU355 projector may turn off after three minutes.
Invest in an authentic Sanyo POA-LMP131 (service parts no 610 343 2069) and avoid the temptation to buy a cheaper priced lamp. These bargain lamps are usually counterfeit lamps and use inferior parts that can damage your projector. They may end up costing you more in the long run. Authentic lamps have been manufactured with reliable parts that work with the sensitive mechanismsin your Sanyo PLC-XU305/PLC-XU355 projector. These authentic lamps come with a guarantee and won’t make your projector’s warranty invalid.
 For additional savings, you can also just replace the POA-LMP131 bulb for additional savings. Learn more in our POA-LMP131 video guide.
STEP-BY-STEP INSTRUCTIONS FOR SANYO PLC-XU305/PLC-XU355 LAMP REPLACEMENT
NOTE: These instructions can also be applied to the Sanyo PLC-XU305K and PLC-XU355K projectors.
Important safety instructions
Before installation:
- Turn off the projector and unplug the AC cord.
- Allow 45 to 60 minutes for the Sanyo PLC-XU305/PLC-XU355 projector to be cool to the touch.
- Don’t open the projector when hot since these machines operate under high temperatures and you can burn yourself.
Replacing the Sanyo POA-LMP131 (610 343 2069) Lamp Assembly
Caution: Don’t touch the screen or the actual bulb with your finger since the oil from your skin can cause a black spot on the bulb.
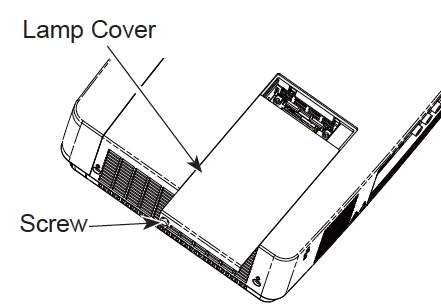 1. The lamp cover for the Sanyo PLC-XU305/PLC-XU355 is located at the top of the projector. Locate the screw holding the lamp cover in place found on the side over top of the ventilation holes. Loosen the screw to remove the cover.
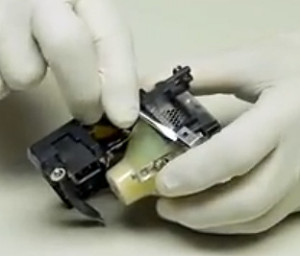
2. Inside there are three screws holding the Sanyo POA-LMP131 (service parts no 610 343 2069) lamp in place. Remove all three screws. Grab the handle on the lamp cage and gently remove the lamp. Place to one side. Be sure to dispose of the lamp properly through a local recycling program.
3. Take the new Sanyo POA-LMP131 (service parts no 610 343 2069) lamp cage by the handle and gently maneuver it into place. Avoid touching the glass or the bulb. The lamp should slide in easily – don’t force it. 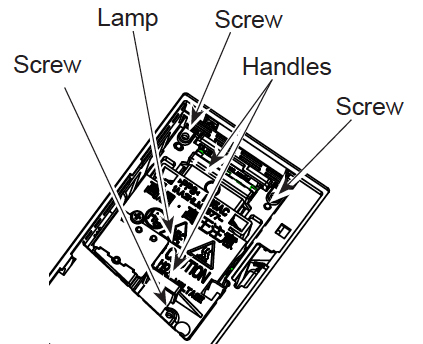
4. Once the Sanyo POA-LMP131 (service parts no 610 343 2069) lamp is in, tighten all three screws on the Lamp Assembly. Make sure the screws have been tightened properly or the projector will not turn on.
5. Replace the Lamp Cover and tighten the screw.
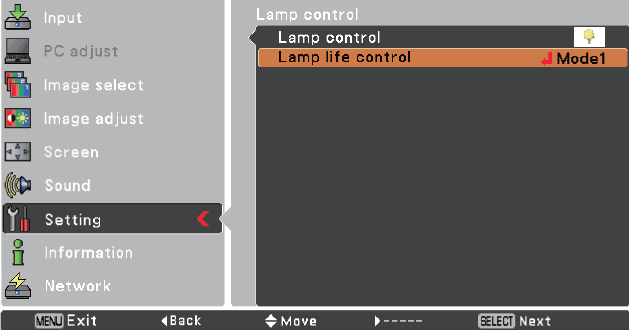
6. Re-connect the power cord and turn on the Sanyo PLC-XU305/PLC-XU355 projector. If the lamp does not turn on after the warm-up period, try re-installing the lamp. Reset the lamp hour using the Lamp Control mode found on the Setting menu.
NOTE: Your old Sanyo POA-LMP131 (service parts no 610 343 2069) lamp should be properly recycled. These lamps contain mercury and can’t be placed into common garbage.
RESETTING THE SANYO PLC-XU305/PLC-XU355 LAMP CONTROL MODE
Reset the Lamp Control Mode only when Sanyo POA-LMP131 (service parts no 610 343 2069) lamp has been replaced. Do not operate the projectors while any of the lamps are removed as this may result in malfunctions, fire hazard and other accidents.
Note:You must wait for at least 10 minutes before changing the Lamp Control mode since the newly installed lamp will need time to stabilize. While your waiting, take the time to clean the air filter as this can extend the life of your newly installed lamp.

To change the mode for the total lighting time:
- Turn the Sanyo PLC-XU305/PLC-XU355 projector on.
- Press the Menu option to display the On-Screen Menu. Scroll down to the Setting option. Select Lamp Control. A second screen will appear.
- Press Point left/right button(s) to move to move the red frame pointer to Lamp counter reset.
- Press the Select button.
- Another confirmation dialog box appears, select YES.
- The Lamp box will disappear and the Lamp Replace Dialog box appears.
- Select YES to reset Lamp Replace Counter.
- There are two modes for Lamp life control. Mode 1 lets the lamp be turned on even after exceeding the recommended total hours of use. Mode 2 lets the lamp be turned on even after exceeding the recommended total hours BUT the projector turns off automatically after 3 minutes.
- Sanyo PLC-XU305/PLC-XU355 projectors have a Lamp control that allows you to change the brightness of the screen and extend the life of your lamp.
Normal mode allows for normal brightness
Eco mode lowers the brightness reducing consumptions thereby extending the lamp life.
Turn the Sanyo PLC-XU305/PLC-XU355 projector on and let the lamp stabilize before using.