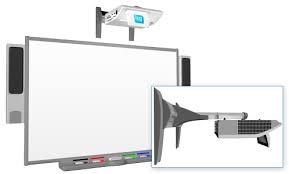
Our step-by-step guide shows you how to replace the Smartboard 600i4 projector lamp.
It’s time to replace the Smartboard 600i4 projector lamp when the projected image gets darker or starts to deteriorate.
Keep your projector working
An authentic projector lamp makes all the difference in keeping your Smartboard 600i4 projector working. Avoid the temptation of buying a cheaper projector lamp since it won’t be properly manufactured. Read the 7 Ways to Spot a Counterfeit Lamp to learn more about avoiding counterfeit lamps.
Find these lamp on Amazon sold by these authorized dealers:
- SpArc Bronze SmartBoard 20-01032-20 Projector Replacement Lamp with Housing
- Lutema 20-01032-20-L02 SmartBoard 20-01032-20 Replacement DLP/LCD Cinema Projector Lamp, Premium
- ePharos® 20-01032-20 20-01032-21 Replacement Lamp With Housing For SMARTBOARD 600I UNIFI 65W 660I UNIFI 65W 680I UNIFI 65W SBP-10X SBP-20W ST230i Unifi 55 Unifi 55w Unifi 65 Unifi 65w Unifi 65w
- Smartboard Projector Lamp Part Smartboard 20-01032-20 ST29017 Model Smartboard 600i4 680i Gen 3
- Lutema 20-01032-20-L02 SmartBoard 20-01032-20 Replacement DLP/LCD Cinema Projector Lamp, Premium
- Lutema 20-01032-20-L02 SmartBoard 20-01032-20 Replacement DLP/LCD Cinema Projector Lamp, Premium
6 reasons to avoid counterfeit lamps:
- shorter lamp life
- created with toxic materials and carcinogenic parts including Krypton-85
- prone to explosions
- can damage the sensitive electronics in your projectors
- no safeguards to protect your eyesight
- no guarantee or refunds offered.
Changing the Smartboard 680i3 projector lamp
Your Smartboard 600i4 projector using the SmartBoard 20-01032-20 projector lamp.
Important Safety tips BEFORE replacing the projector lamp:
- Close the projector lens door to prevent scratching or touching of the lens.
- Press the power button twice on the ECP (extended control panel) or on the remote to put the system in Standby mode
- Turn off the power switch and disconnect the power cord and all connected cables.
- This projector operates under high temperature and there is a burn risk so be sure to wait at least one hour minutes for the projector’s housing to completely cool.
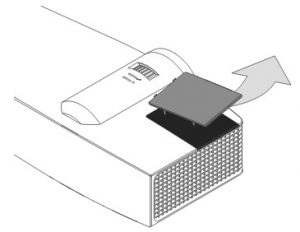
Removing the old lamp
-
Pull off the Smartboard 600i4 outer lamp cover with your finger and set aside.
-
Loosen the two screws on the SmartBoard 20-01032-20 inner lamp module. The screws will remain captive.
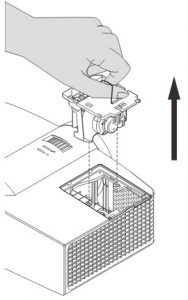 Grab the wire handle on the old lamp and gently pull it up out the projector. NOTE: The SmartBoard 20-01032-20 projector lamp contains mercury and should properly recycled and NEVER thrown into regular garbage.
Don’t touch the lamp with fingers when removing or replacing the new lamp. Oils from your skin can damage the lamp when it heats up leaving black marks on the bulb that appear on screen.
Inserting the new lamp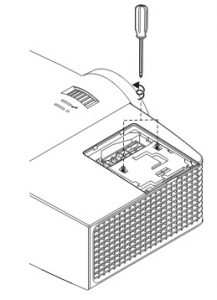
- Remove all packaging from the new SmartBoard 20-01032-20 projector lamp. Grab the wire handle and gently placing it into the projector.
- Tighten the three lamp screws on the SmartBoard 20-01032-20 projector lamp.
- Put the inner lamp cover back on and secure the inner lamp screw back into the lamp slot. Tighten the screw to ensure the lamp cover is secure.
- Put the outer lamp cover back into its original position. Align the cover and tighten the screws until the outer lamp cover is secure.
Resetting the lamp timer
- Press the power button on the ECP or remote twice to put the projector back into Standby mode. The power button light on the ECP turns solid amber when the projector is in Standby.
- Press and hold the up button on the remote control for approximately 10 seconds. When the projector beeps, press and hold the down button on the remote control for approximately 10 seconds. The lamp timer clears after another beep.
- Press the power button on the ECP or remote to start up the system. The power button light on the ECP turns solid green when the system starts.
- To confirm that the lamp timer has been reset, press the MENU button on the remote control. Scroll to the Status Display menu heading, and then confirm that 0 h appears in the Lamp timer field. Your lamp reset count has increased by one.
- Wait five minutes for the projector lamp to warm up.
- Put the system back into Standby mode by pressing either the ECP power button on the projector or on the remote. The power button light will flash amber when the projector is in Standby mode.
- Once the projector is in Standby mode, turn the master power switch off and then on again. The projector is now ready to use.
Learn how to extend the life of your SmartBoard 20-01032-20 projector lamp with Top tips for extending DLP projector lamp life